Panda Cupcakes

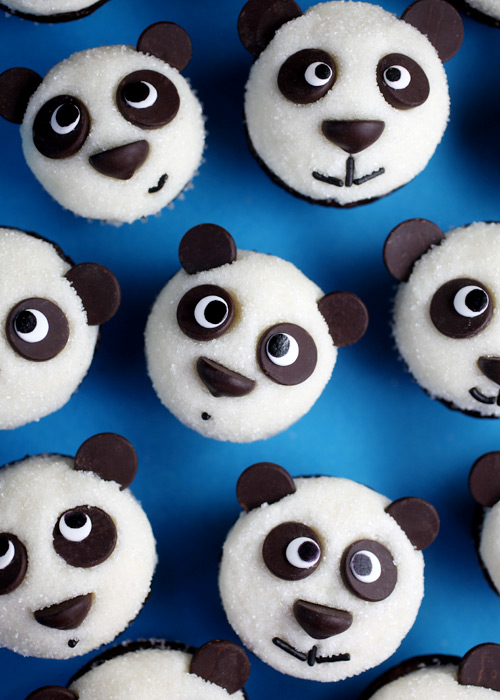
Here is a fun way to decorate cupcakes to look like panda bears, courtesy of Bakerella.

cupcakesdone
(Bakerella)

Ingredients to make mini cupcakes:
1. cupcake mix – for as many cupcakes as you want or need.
chocolate flavor creates a complete look, but you can do any flavor.
2. chocolate chips – to make the ears, nose, and eye base. Ghiradelli brand has better diameter for this purpose, or another of comparable size.
3. white frosting –  enough for all your cupcakes.
4. white sanding sugar – to give the texture of fur.
5. Jimmies – chocolate or black to make mouth lines.
6. white pastel confetti sprinkles – for the white of the eye.
7. black edible ink pen – to draw pupils on the white sprinkles.

Note: If you wanted to make larger panda cupcakes just tweak the ingredients to use chocolate drops or large chocolate chips (which you might have to cut in half for the nose), larger or more sprinkles for the mouths, and use premade candy eyes or get creative with a circle of icing or fondant with a black sphere sprinkle or black edible ink circle for pupils. The process of putting them together would be the same.

Instructions:
1. Make your cupcakes according to your favorite recipe or the box in a mini cupcake pan (hey sometimes we all need to save a little time). Allow to cool.

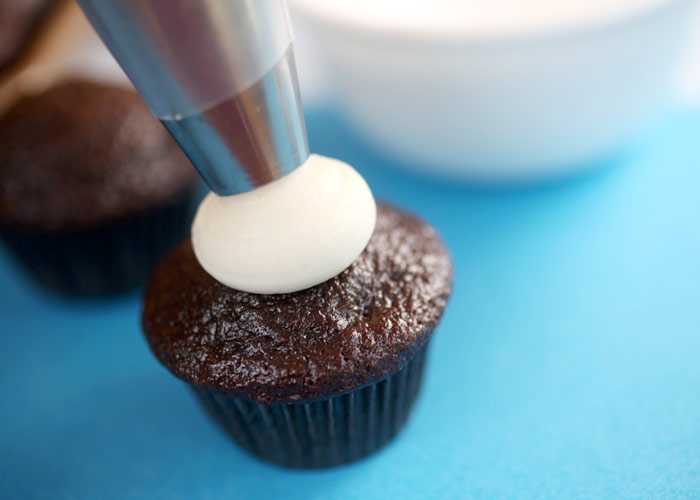
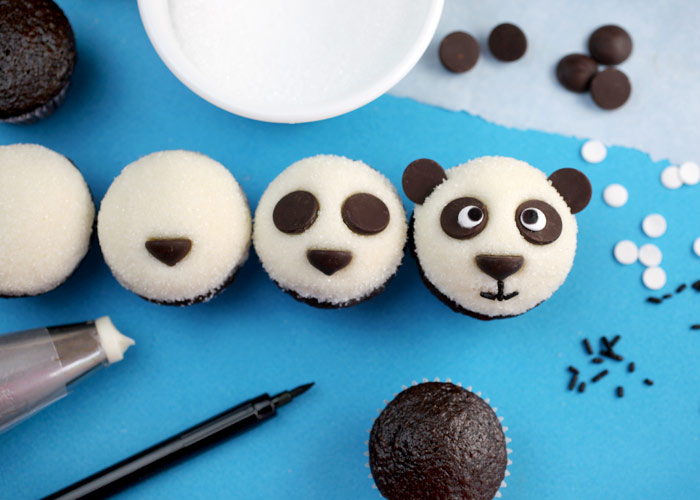
2. Frost the cupcakes with the white frosting. A decorator bag with Ateco tip #807 will help to pipe a small mound of frosting on top of the cupcake. You do not need to cover the whole top because you will be pressing them in to the sanding sugar which will force the mound out to cover the whole top.

7105039437_ff6b820869_o
(Bakerella)

3. Press the frosted cupcakes into the sanding sugar to spread the frosting and create a fur like texture.

6958970850_14e9b1e91e_o
(Bakerella)

4. Press chocolate chips into the frosting to create the face. One should go sideways, point facing downward, towards the bottom of the face to create the nose. Two should go point down into the frosting above that to make the base for the eyes.  And two should go into the sides of the frosting, point down, to create ears.

7105039491_602217ef4a_o
(Bakerella)

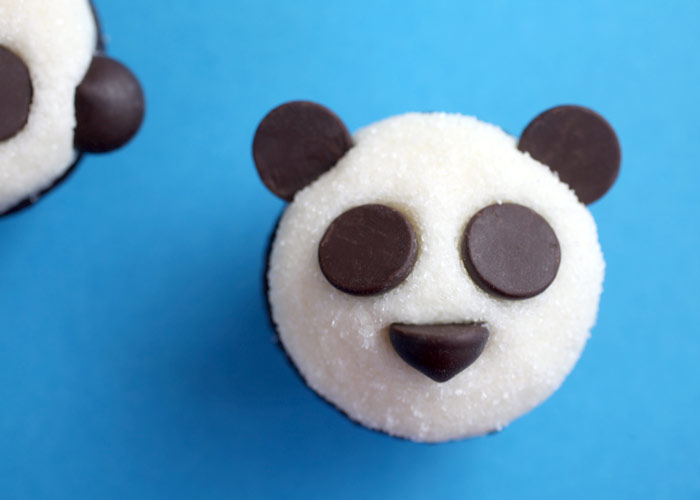
5. Press the Jimmies into the frosting to create any type of mouth you want.

6958970950_09c8aff37c_o
(Bakerella)

6. Finish the eyes by drawing circles on the confetti sprinkles and then attach them to the chocolate chip base with a bit of frosting. Or use frosting to make the eyes, or attach premade candy eyes.

7105039801_2f689f8fcf_o
(Bakerella)

7. Make sure each face is how you would like them. Having the sanding sugar over the frosting also allows you to reshape the frosting to get your desired look.

8. Serve and enjoy!

This design is really cute and allows you to do your own take on just how a panda should look. Great for kids parties or just because!

– Fizz

You can see more pictures and get Bakerella’s cupcake and frosting recipes here.

Confectionery Magic

I hope that everyone is having a wonderful Friday!

I have found another set of wonderful confectionery treats in cute animal designs to share with you. Cake, cupcakes, cookies, and sugar are wonderful mediums! I included a link to the baker’s website or facebook page so you can purchase some wonderful treats if you live in their area.

Kandy Cakes 

This bakery located in Stratford Ontario creates beautiful custom cakes, cookies, and cupcakes.

Zebra Cake

404761_119609151495599_177877803_n

Deer Cake

426434_138049036318277_1684868227_n

Stuffed Rabbit Cake

581346_324112551045257_1589152109_n

Giraffe Cake

420348_119602741496240_531731469_n

Butterfly Cupcakes

417797_121121418011039_334131694_n

All above photos are from Kandy Cake’s facebook page.


Made With Love By Me

This wonderful pastry artist from London makes and decorates beautiful cakes and cookies.

Owl Cake

484825_322917547825631_1577446351_n

Lion Cake

Lion-LR

These photos are from the Made With Love By Me website, and more information can be found on her facebook page.


Michelle Sugar Art

Michelle Wibowo creates beautiful sugar art and cake sculptures, she is located in West Sussex.

elephant

Tiger Cake

tigercate

Pegasus sculpture

pegasus

She even has a Guinness world record for creating the worlds largest Corgi cake.

IMG_2996

Here is a video of the real corgis eating the giant cake.

You can find out about pricing, see more examples of her art, and find order information on her website Michellesugarart.co.uk and you can follow her on facebook.


Highland Bakery

The Highland Bakery is located in Atlanta Georgia, and makes all kinds of baked goods including custom orders.

Wombat Cake

wombatcake

Rhino Cake

rhinocake

The above two photos are from the Highland Bakery’s website, where you can see more photos and learn more about ordering.

You can also follow them on facebook. Here are a couple of cakes posted on their page:

Dressed up Rabbit

564736_10151504047554330_1261338502_n

Chubby Bunny with Carrot

556793_10151467339109330_1438533222_n

How to: Make Penguin Cupcakes

Today I discovered the blog Our Best Bites, which has an article with all the steps required to make cupcakes topped with candy penguins. These little guys will be the hit of the party!

The receipe includes only easy to find ingredients and does not require that you be the best chief. This is a great cooking project that can be done all in one sitting or put together in steps, or is a good project you can work on with your kids.

Candy Penguin Cupcakes
By Our Best Bites

Ingredients:
Unfrosted cupcakes, any flavor (I use the recipe from this tutorial, but you could easily use unfrosted cupcakes purchased from a bakery)
White frosting (I use this recipe)
Coconut
1 bag of large marshmallows
Sanding sugar, white sparkly sugar, or white sprinkles
1 bag of semi-sweet chocolate chips
2 Tbsp. shortening
Candy corn
Trolli Gummi Strawberry Puffs (I just found these in the candy section at Wal-Mart)
1 cube almond bark
Yellow and orange Starbursts

Supplies:
–1 pair kitchen shears
–Some kind of foam, preferably floral foam
–Bamboo skewers
–1 large Ziploc bag
–2 small Ziploc bags (snack size is perfect)

The process to make these little guys is quite involved, but not overly difficult. The total time to make 24 of these guys, if you do everything in one go, will take around 3 to 4 hours.

Below is an excerpt from the site of how to make these guys, for more complete directions (including helpful pictures) please see Our Best Bites: Tutorial: Candy Penguin Cupcakes.

Brief how to:

1. Combine chocolate chips and shortening. Heat in the microwave, stirring about every 30 seconds, until the chocolate is completely melted.

2. While chocolate is melting, insert a bamboo skewer about halfway into a flat end of each marshmallow. You can stick these into the craft foam while you wait for the chocolate to continue melting.

Note: It is best to work at making 6 penguins at a time so that the chocolate does not harden before you are done.

3. Work quickly to dip each skewered marshmallow into the chocolate, tap the skewer onto the side of the bowl a few times to remove excess chocolate. Place the skewer holding the dipped marshmallow into the craft foam so the chocolate can dry without touching anything.

4. When you’ve dipped about 6 marshmallows, wash your hands thoroughly to remove any chocolate. Pour a small amount of sanding sugar/sparkly sugar/sprinkles onto a plate.

5. To Make the Penguin’s White Tummy: Using your kitchen shears, carefully cut a thin slice (about 1/8″) of marshmallow. Then, dip the sticky side (or just one side if both sides are sticky) into the sanding sugar and then carefully place the non-sugared side onto the dipped marshmallow (The melted chocolate will hold the marshmallow slice in place and the sanding sugar will keep anything from sticking to his tummy). Repeat with remaining dipped marshmallows.

6. To Make Penguin Feet: Take two candy corns per penguin and place them directly above the penguin’s tummy, on the round bottom of the marshmall. Have the fat, yellow end poking out over the edge of the marshmall and the small white ends forming a “V” together. The feet will stick out at an angle with only the yellow of the candy being visible.

7. Let the half-penguins dry.

Note: This is a good place to stop and continue at another time if desired.

8. Ice your cupcakes. Fill a large Ziploc bag with icing and then cut about 1/2″ off the corner, squeeze the icing onto the cupcakes. Then spread the icing out with a knife.

9. Place a penguin body on each iced cupcake.

10. For Snow: Gently press some coconut around each penguin body. If you’re allergic to or don’t like coconut, you could also use some more sanding sugar instead of the coconut.

11. You’ll probably need to reheat your chocolate at this point. Heat it until it’s liquid and then give it a good stir.

12. To make the penguin heads: Dip each Trolli Strawberry candy into the chocolate and then twirl it a little to remove excess chocolate. Carefully place the dipped candy onto the penguin’s body, the oblong side directly above the penguin’s tummy (this will be his face).

13. Wash your hands really well again to remove chocolate.

14. To Make Beaks: Carefully cut off a small piece of the Starburst (maybe a 1/8″ corner) and then form it into a beak between your fingers. Carefully place it in the middle of the penguin’s face (the chocolate on the head will still have to be warm for this to work).

15. To Make the Whites of the Eyes: Heat the cube of almond bark in a ziplock bag in the microwave for 1 minute, checking it every 20-30 seconds (and mashing it around with your hands a little each time), until the bark has melted. Then cute a small hole in the bag, and squeeze two eye blobs above the penguin’s beak.

16. To Make Pupils: Place dipping chocolate in ziplock bag, reheat a bit if necessary, cut a small hole in the bag, and place a small dot onto the whites of each eye.

17. Allow all the penguins to dry and then enjoy!

As I said above, please see Our Best Bites: Tutorial: Candy Penguin Cupcakes for full directions, complete with pictures and additional helpful tips.